What You Should Know Before You Let Anyone Touch Your HVAC System
Most people don’t think about their HVAC system until something goes wrong, but just like a car needs oil changes and tire rotations to run smoothly and last longer, your heating, cooling, ventilation, filtration, and dehumidification systems require regular maintenance to stay safe, efficient, and reliable. Routine care can prevent expensive repairs, improve air quality, and extend the life of your equipment. In this article, we’ll walk you through what proper HVAC maintenance entails, what should be included in a professional visit, and how to determine if your service plan is actually protecting your investment or just a box-checking appointment with no real value.
Your HVAC system's routine maintenance (also known as a tune-up) includes the basic care that keeps your system running, similar to changing your automobile’s oil every few thousand miles. This maintenance refers to the ongoing care and professional service that keeps your system operating reliably and efficiently. It can include tasks such as changing filters (which we’ll cover in more detail later), checking the thermostat, inspecting components, performing physical cleaning, and testing the system under operating conditions. The homeowner can perform some tasks themselves, such as changing their filter regularly, while other aspects are best handled by a qualified technician as part of a scheduled service appointment.
While the terminology may vary, the purpose remains the same: to evaluate, clean, and test the system to ensure safe and efficient operation. Be prepared to ask questions to make informed decisions and ensure you’re getting a service that protects your system. These tasks are necessary, and skipping them can lead to poor air quality, the buildup of microbial growth, premature system failure, and higher energy consumption.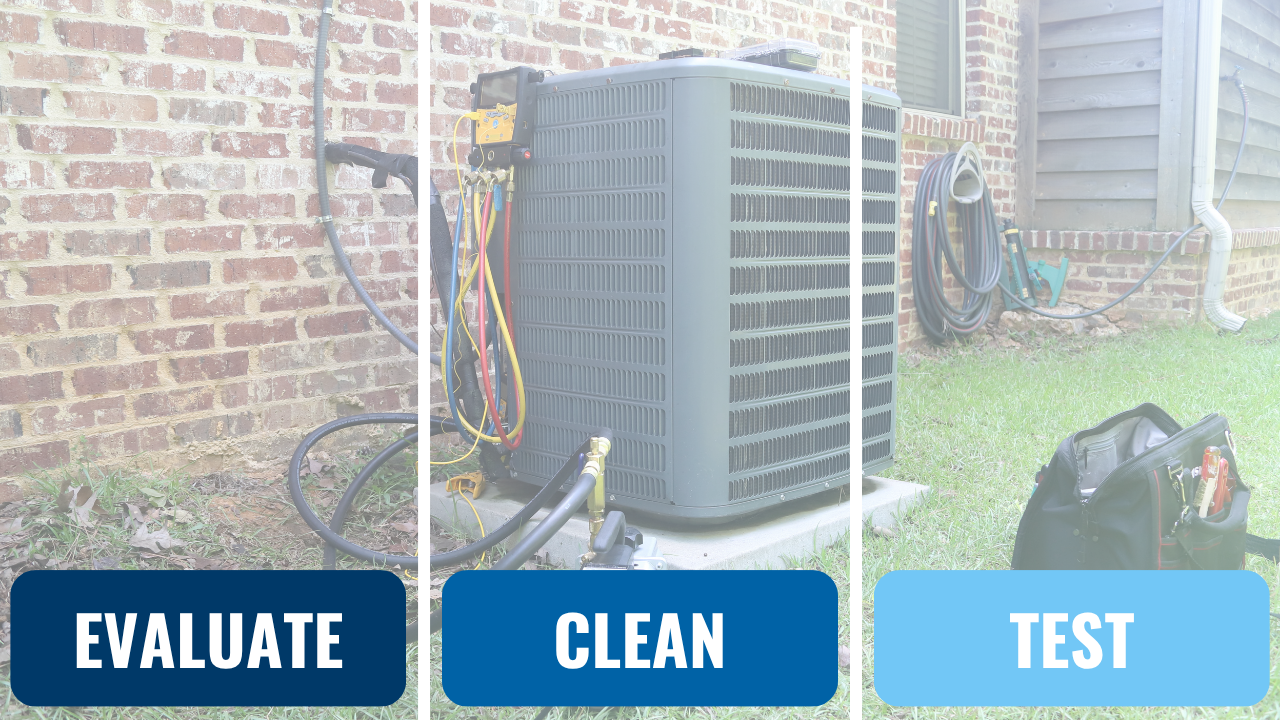
To begin, here are some basic HVAC concepts. Your HVAC system consists of heating and cooling equipment. They work together to condition the air inside your home. They do this by removing heat and moisture from the air. You will likely have an indoor air handler located in your attic, basement, crawlspace, or in a closet or mechanical room inside your home. While HVAC setups can vary based on region, home size, fuel source, and design, the basic components are generally the same. See the illustration below:
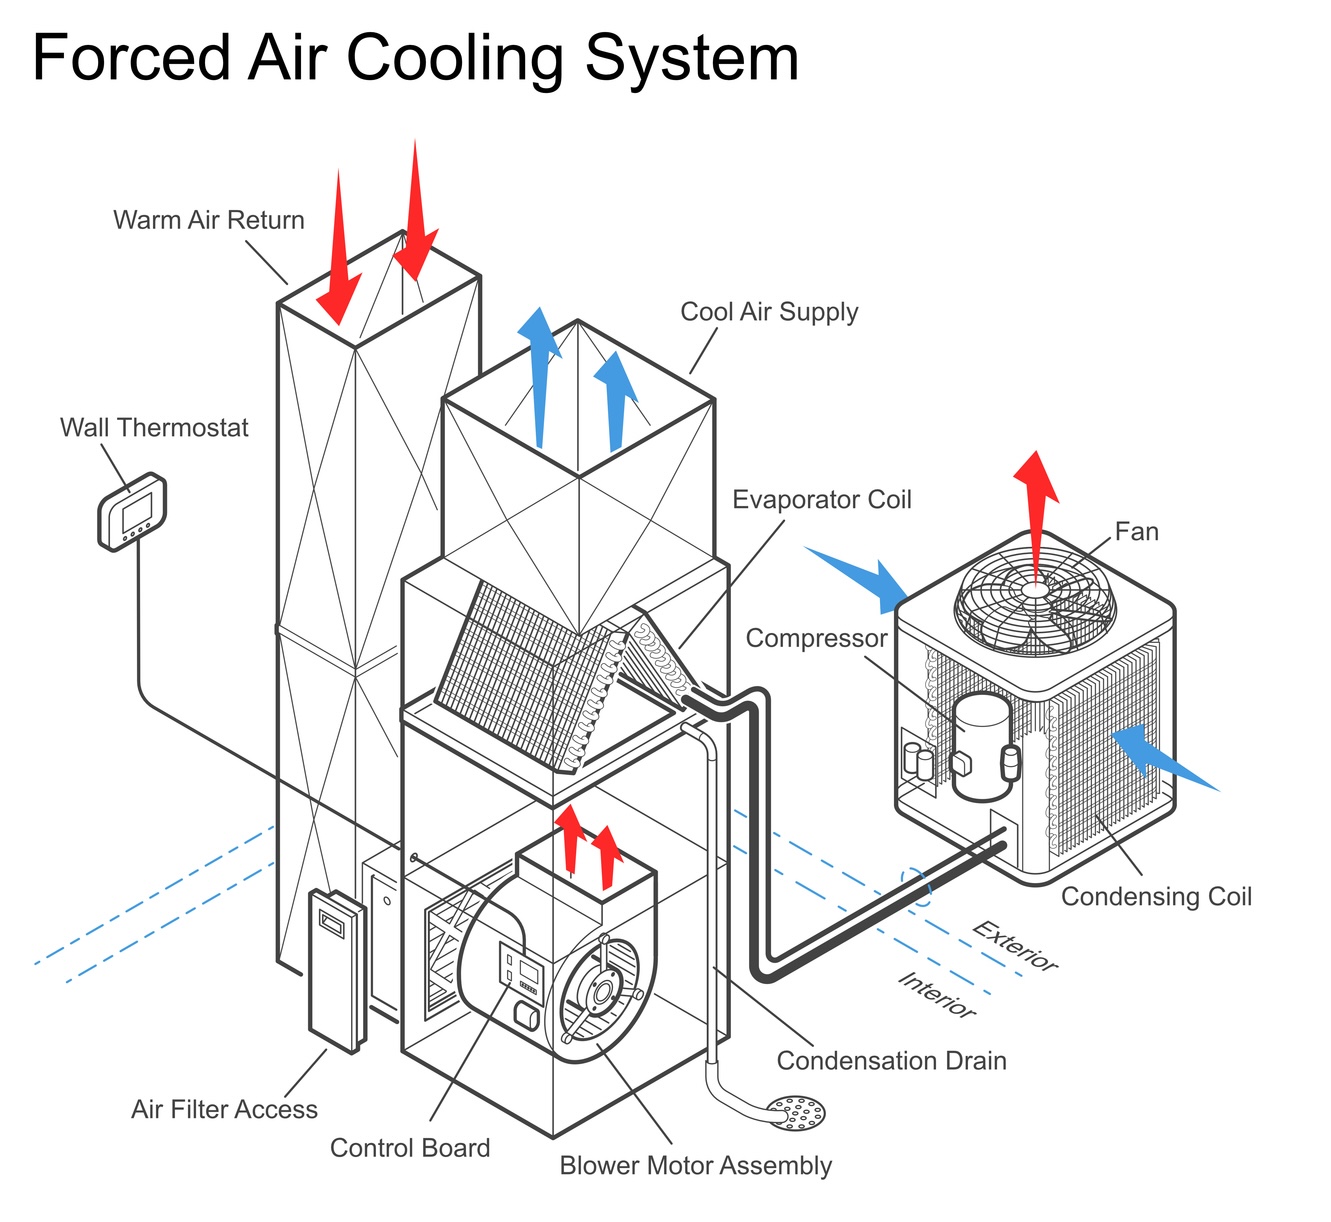
Residential HVAC System isometric technical illustration
Now that you know the basic components of your HVAC system, let’s return to routine maintenance. Tasks like changing basic filters can be handled by the homeowner. In contrast, others require a trained technician with the knowledge and tools to properly test and measure airflow, static pressure, refrigerant charge, and staging. This type of maintenance is often scheduled seasonally and may be offered through a service plan. These plans can be helpful, but always read the fine print; many contracts use the term “maintenance” or “tune-up” without guaranteeing that any actual testing or cleaning will be performed. The key is to ensure that your technician is doing more than just a visual inspection; if they’re not measuring or cleaning your system, they’re not maintaining anything.

While this process does not need to take all day, a thorough HVAC maintenance appointment should take between one and one and a half hours per system in your home. For example, if you have two HVAC systems in your home, be prepared for one technician to spend three hours on this appointment.

The timing of each tune-up will depend on your climate and what types of equipment you have in your home. This is one reason a checklist you can review is helpful. Here are some examples of what you can expect on a thorough maintenance visit. Ask the technician if you can see their checklist of items that will be addressed in your HVAC tune-up. Here is a sample checklist.
Spring Checklist - Cooling
The spring visit prepares your system for the approaching hot temperatures and the start of the HVAC cooling season. This maintenance prepares your system for high humidity and heat. Here is a sample of some of the items on the checklist for you to look for:
Evaporator Coil Cleaning and Inspection – This improves efficiency and prevents the buildup of dust and microbial growth. Depending on the level of dirt, the coil may be cleaned in place with a brush. If it is too dirty, they may recommend removing the coil to clean it with a chemical cleaner, which requires additional discussion and details and will incur an extra charge. This is a tedious and challenging process and must be done by a professional. When the indoor coil is dirty, remember that it is a symptom of a root issue: moisture and dirt in the HVAC system and air stream.
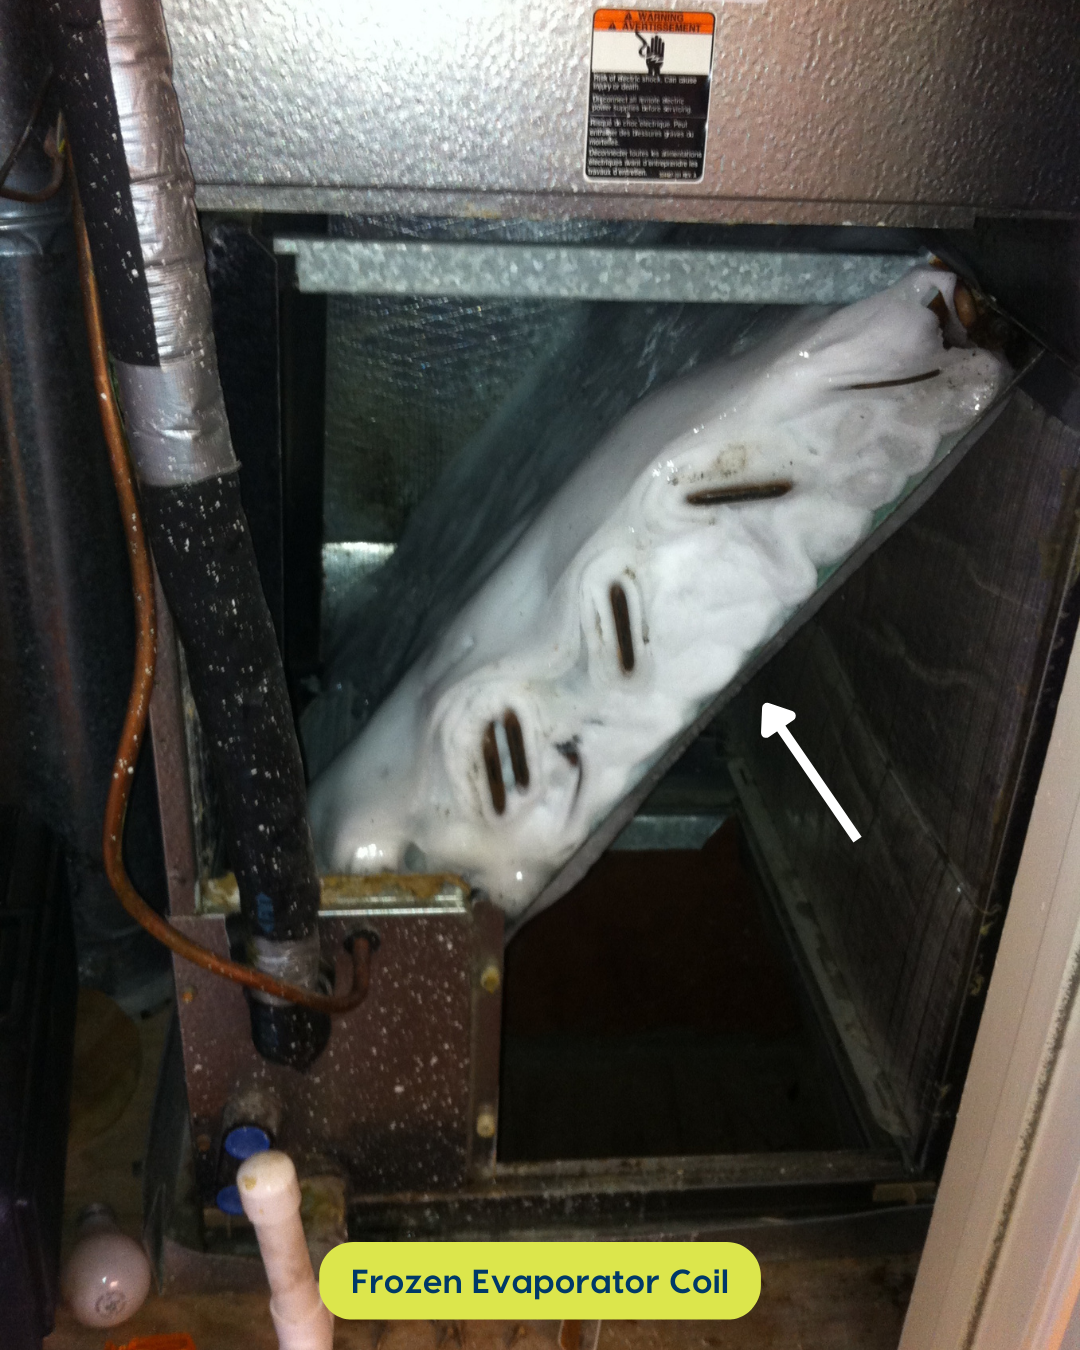
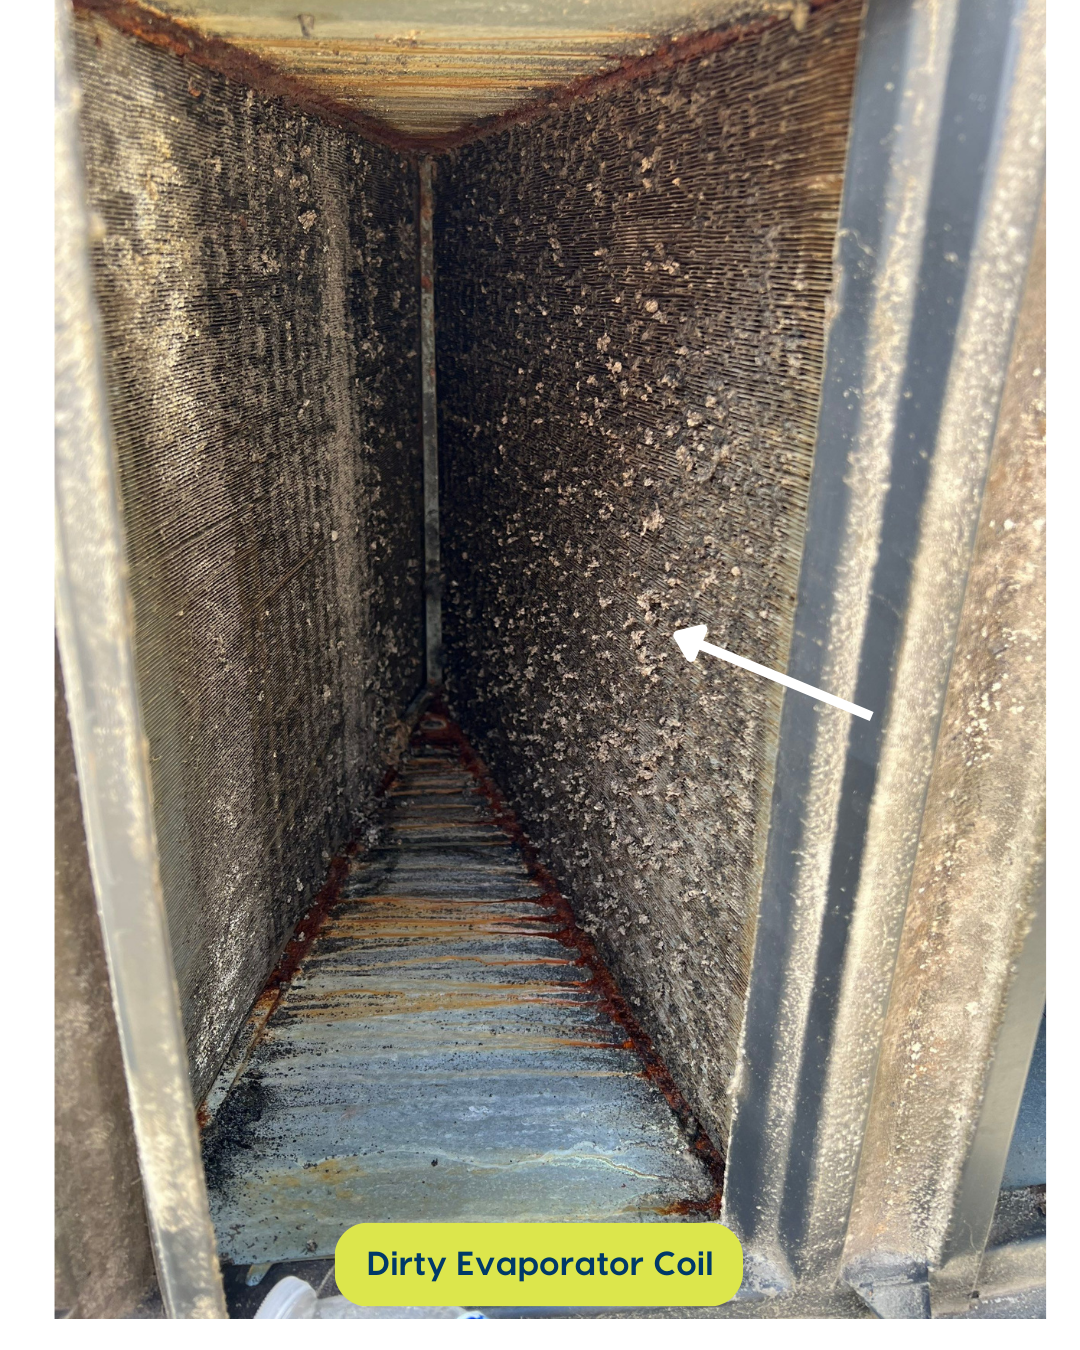
Refrigerant Level (Freon), Pressure, and Temperature Check – This verifies that the system is operating optimally and in accordance with the manufacturer's recommendations. The refrigerant pressures and levels are unique to each piece of equipment. These pressures can also be affected by the outdoor environment and may change accordingly. The data sheet below shows what the technician sees when he checks your system's refrigerant. Your technician should have up-to-date digital testing tools. If your refrigerant level is low and your system requires more refrigerant, the technician should weigh the refrigerant so they know exactly how much your system has taken, allowing for an accurate bill.
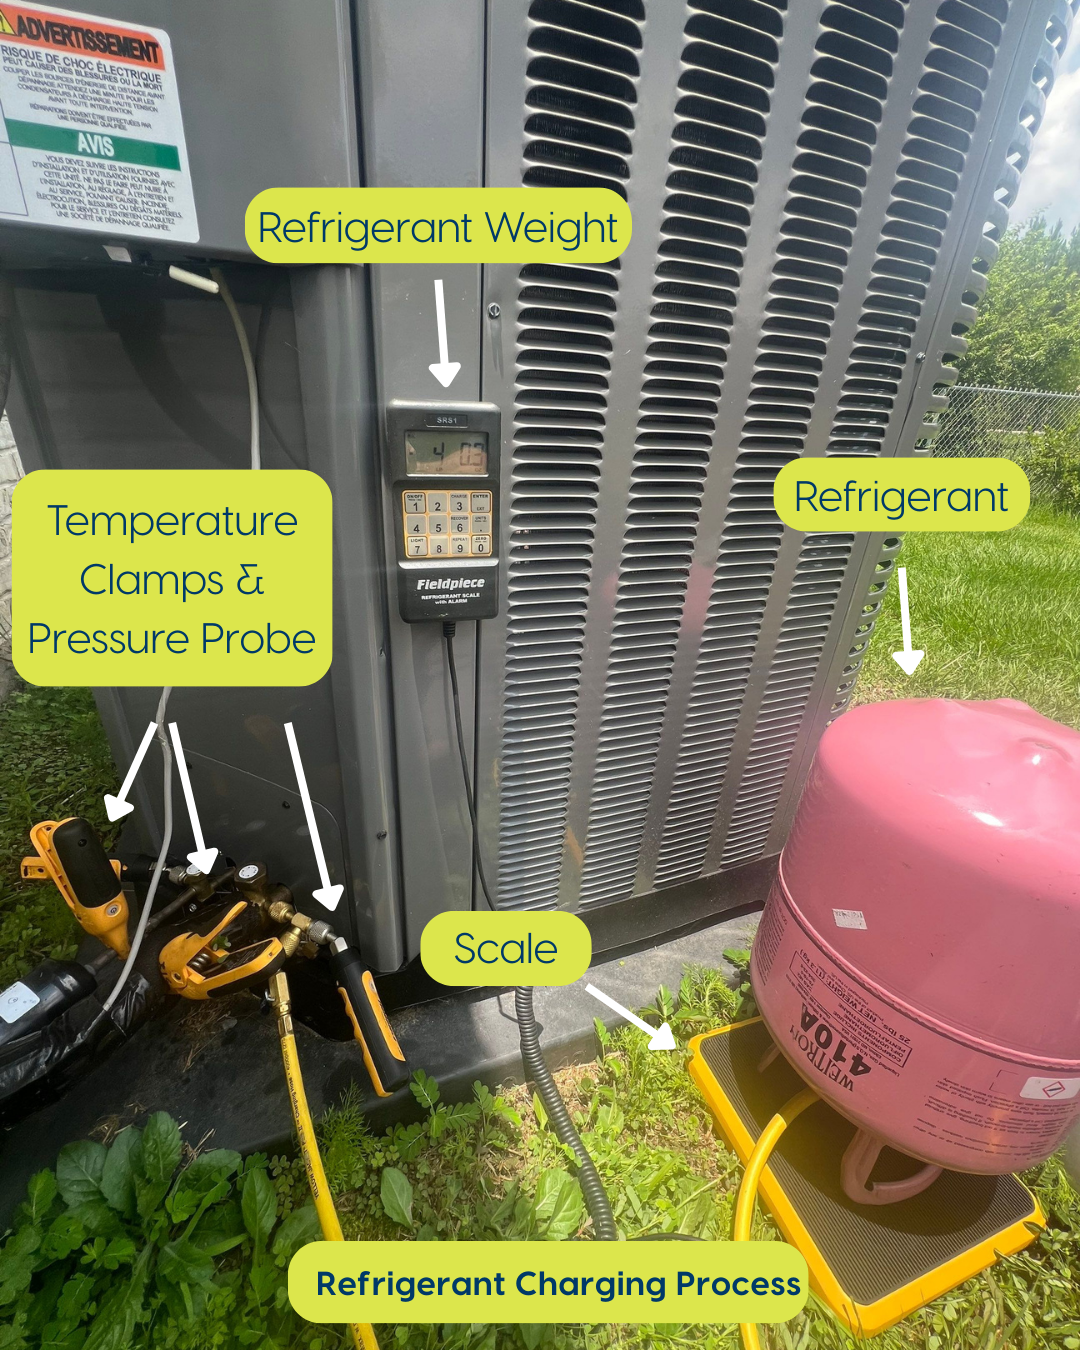
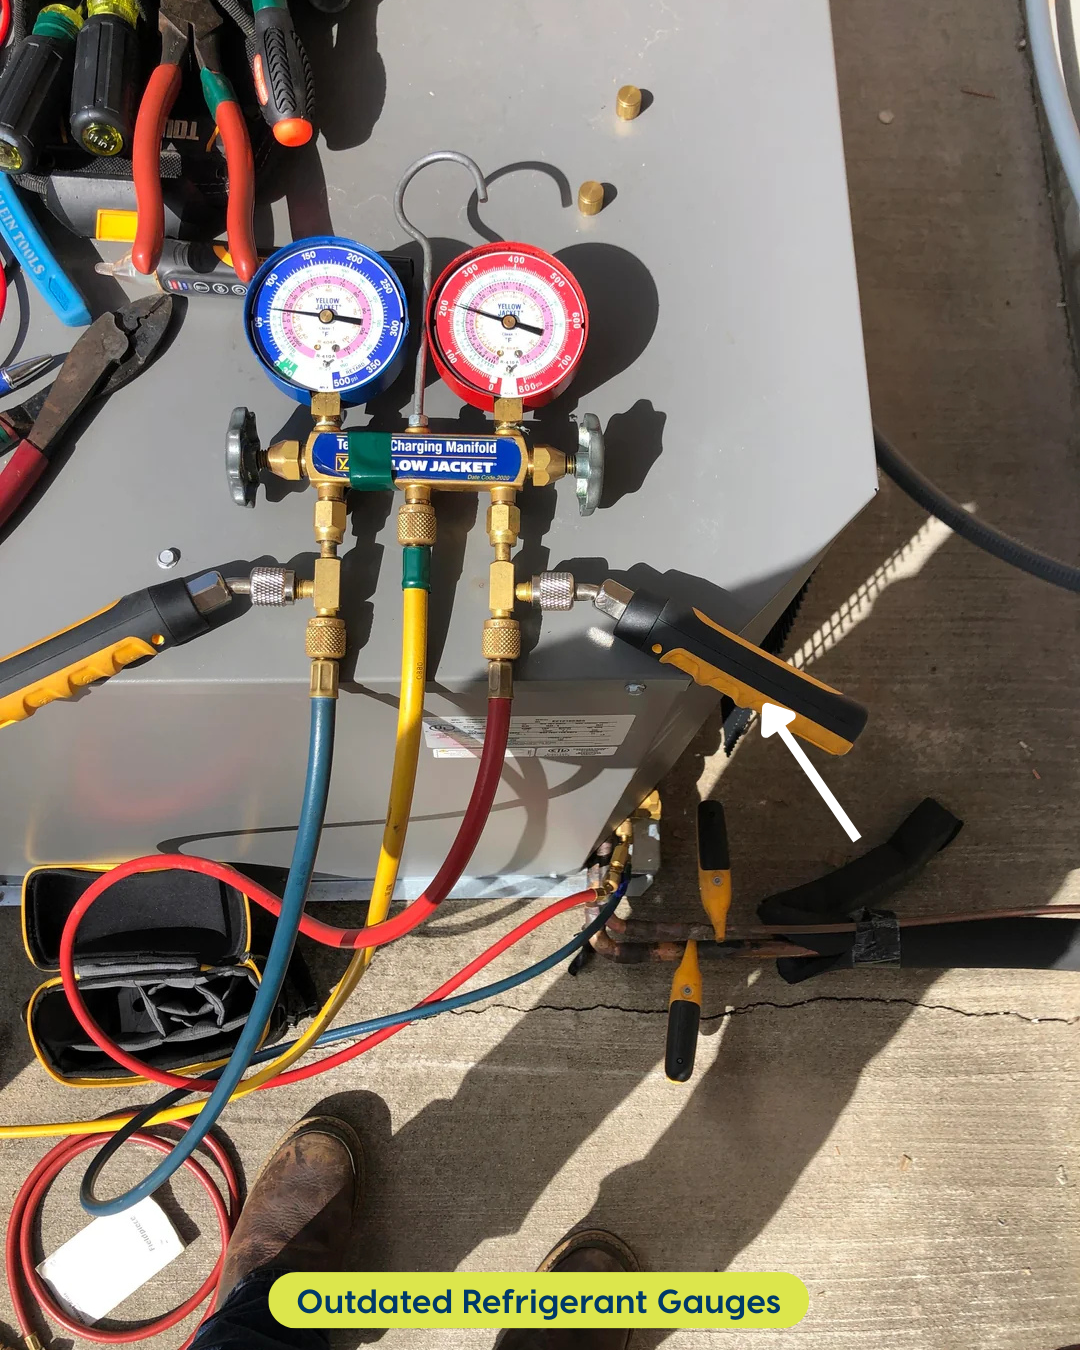
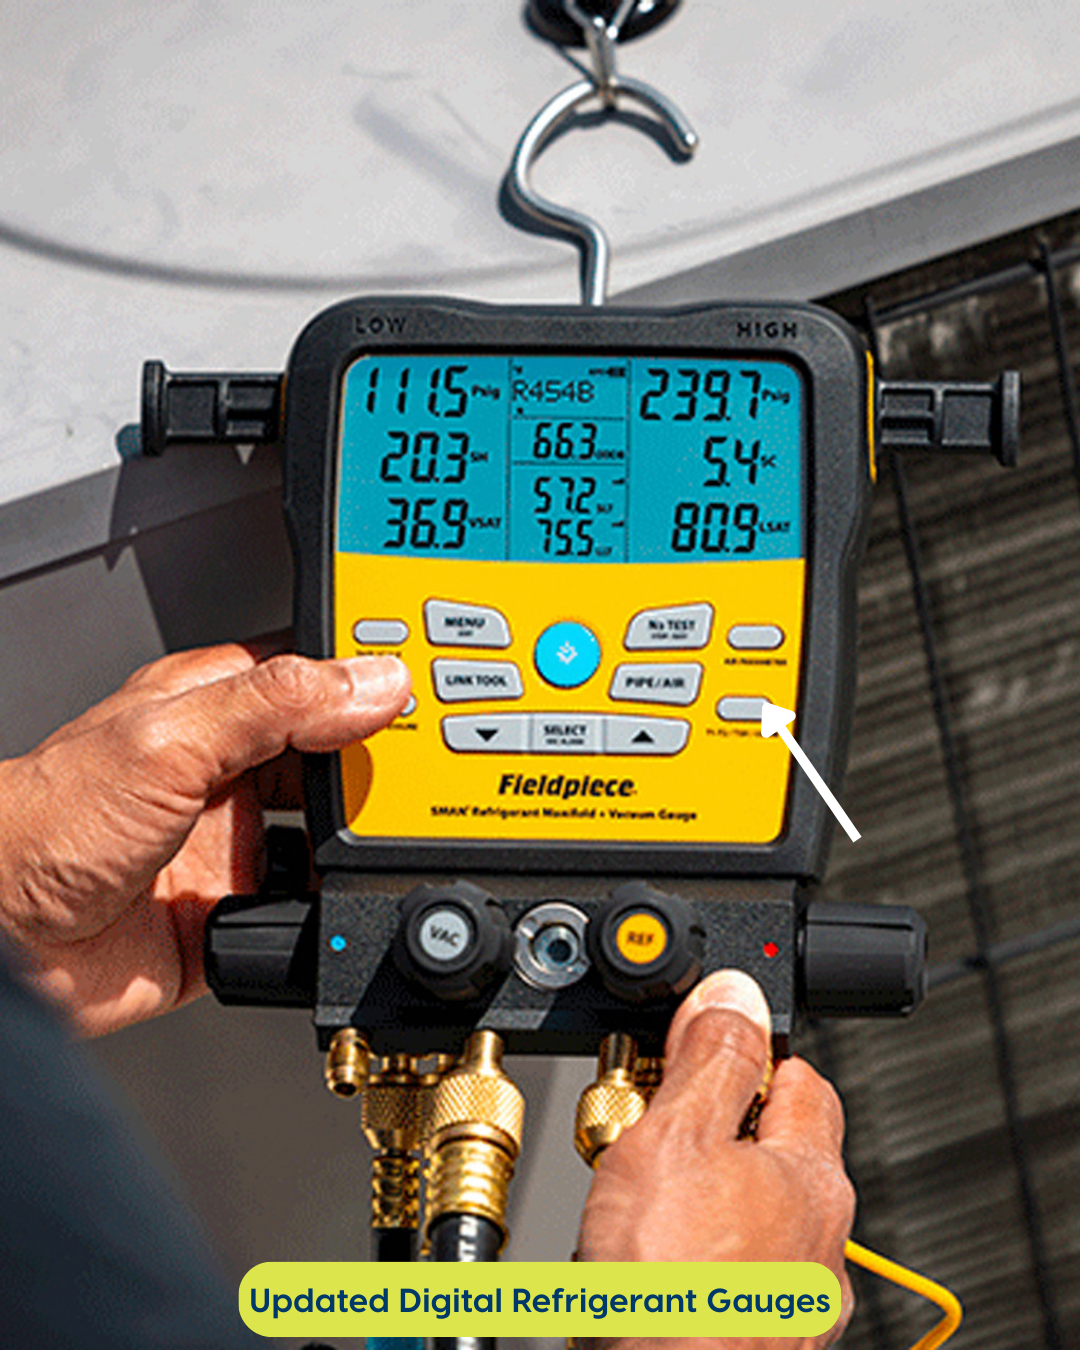
If your technician has outdated testing tools and equipment, you may want to ask further questions or consider updating your HVAC service company or technician. Most of the newest refrigerant gauges are utilized online or in digital applications. They will use various probes and clamps connected digitally with the app to check your refrigerant data. See images below.
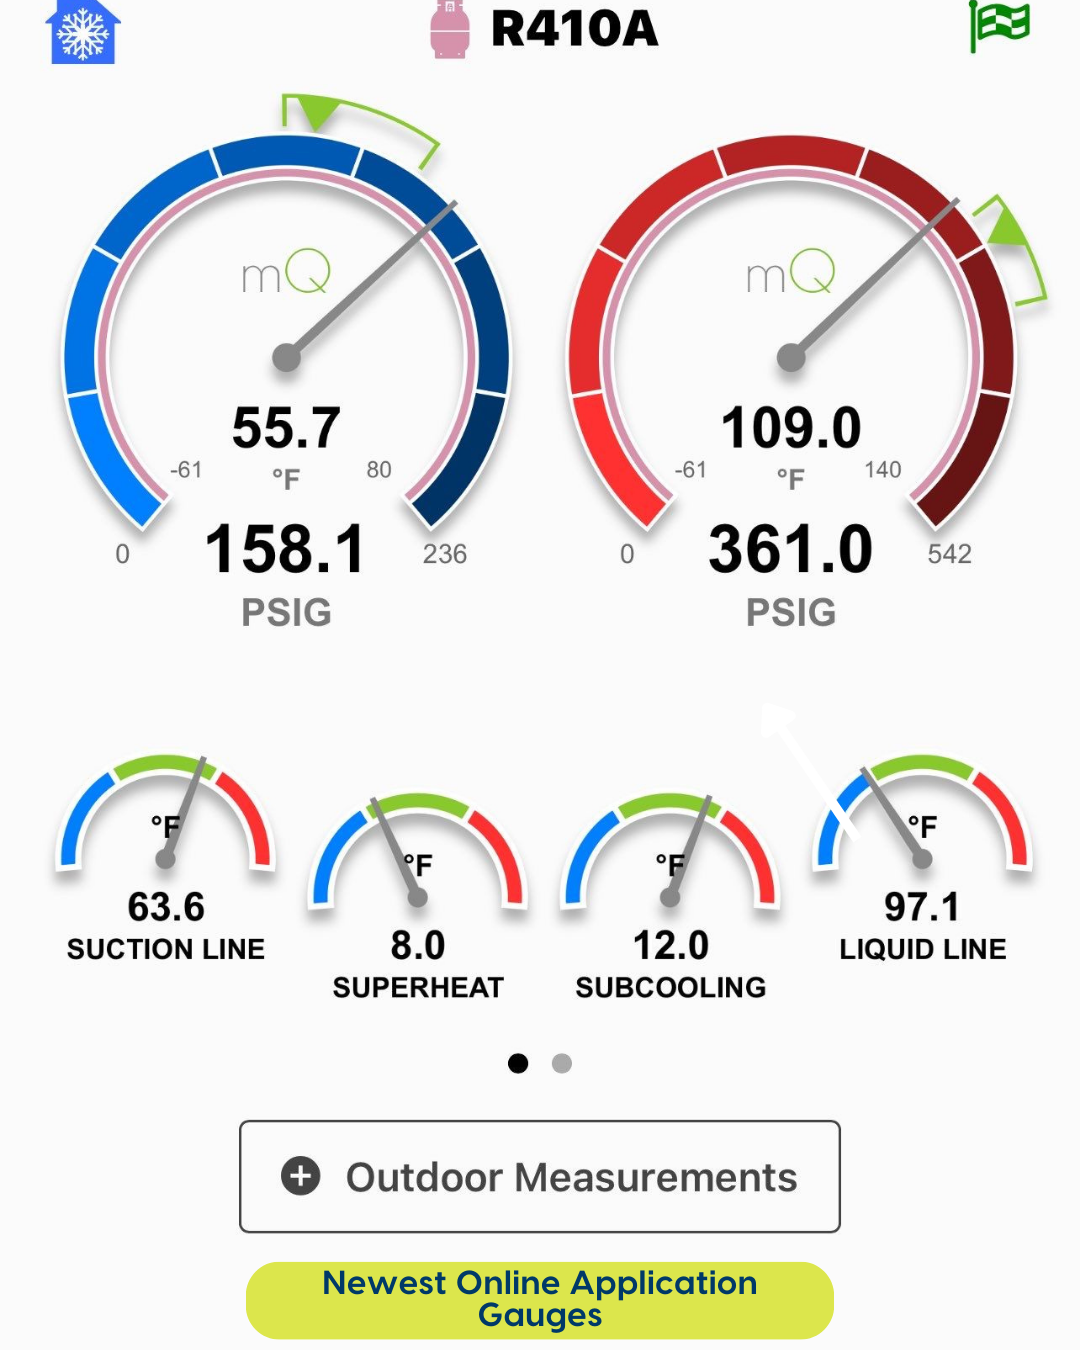
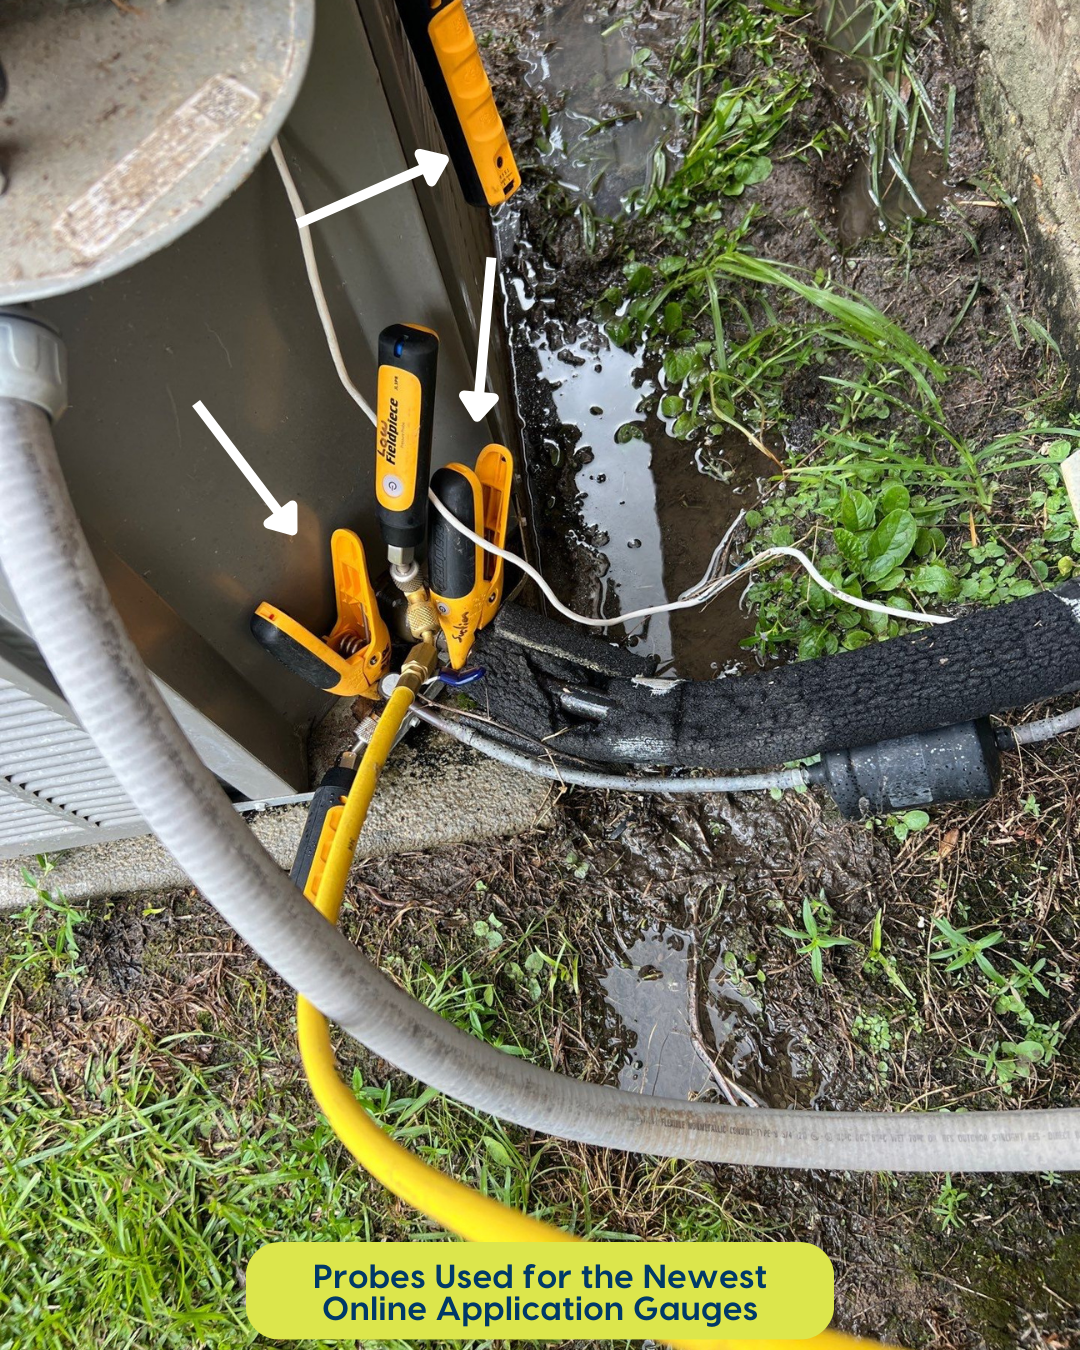
- Thermostat Testing and Calibration – This ensures your thermostat is reading the temperature accurately and not miscalibrated.
- Electrical Connections Inspection and Tightening – This ensures the safety and reliability of the system and that each connection is secure.
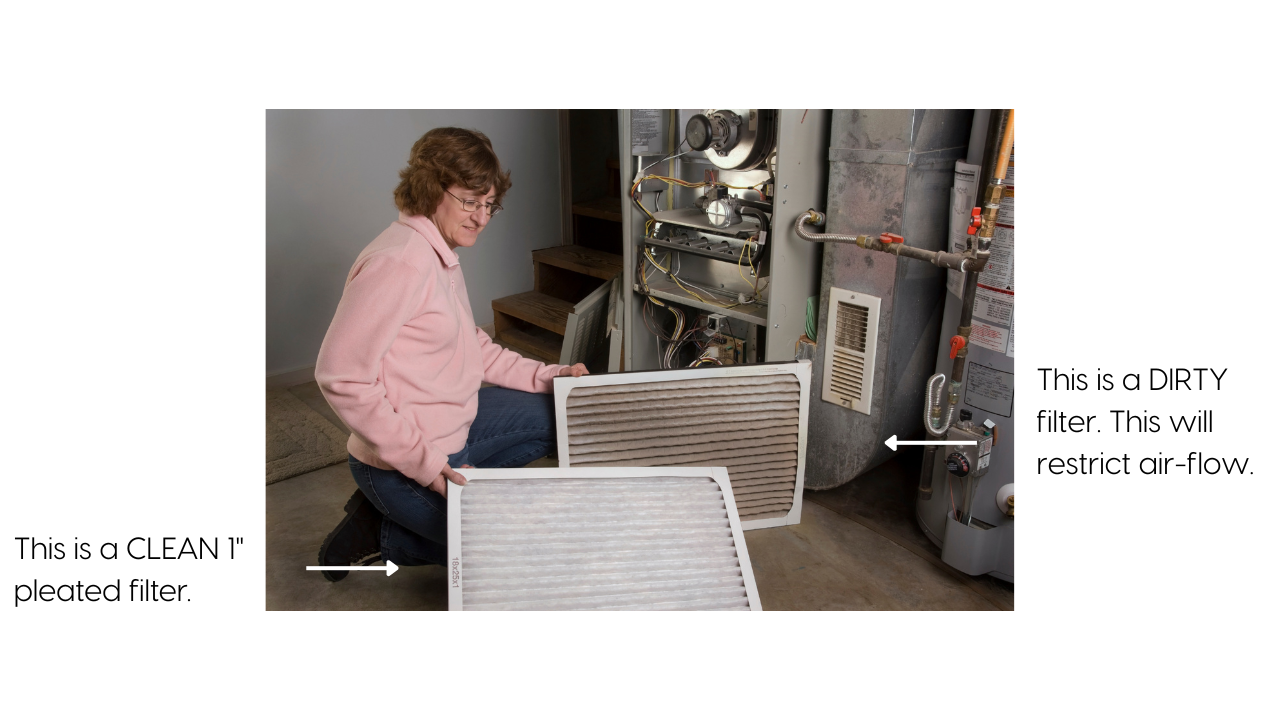
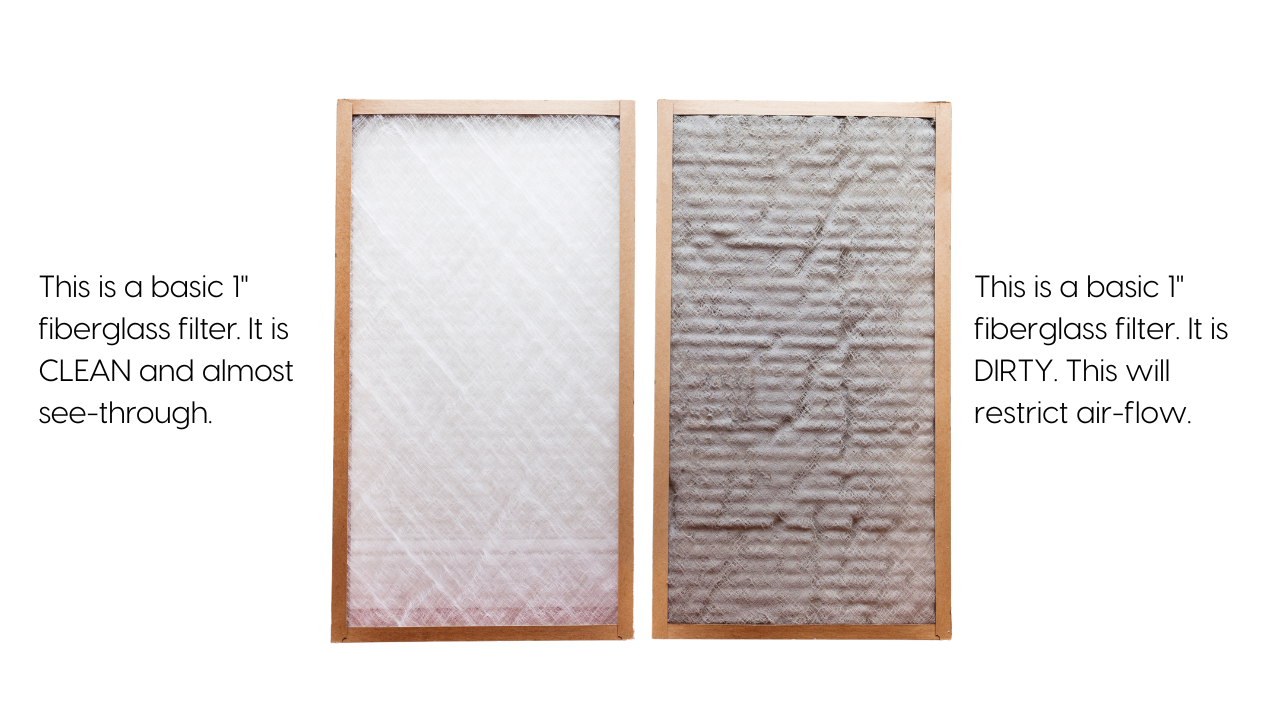
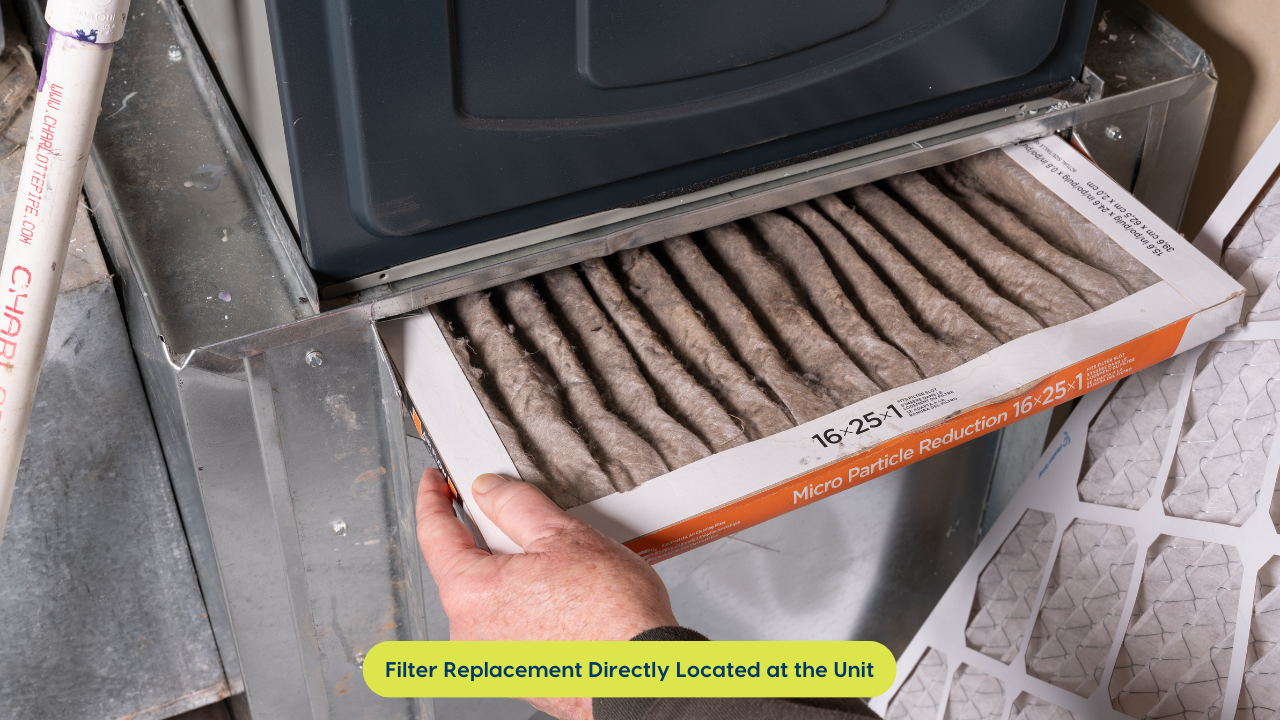
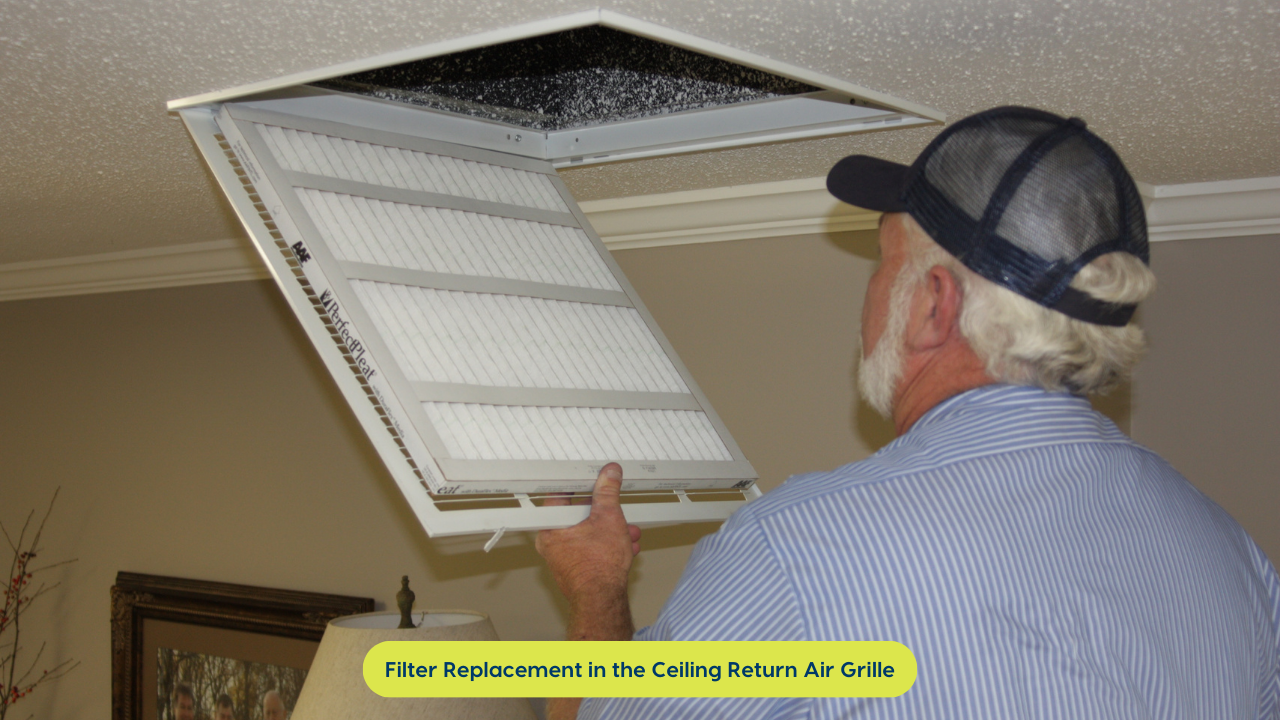
- Air Filter Replacement – This ensures you have a clean filter in place and provides an opportunity to verify that your filter is both properly sized and appropriately rated for your HVAC system. Your filter should fit snugly in place, whether that is in your return air grille or at the unit in a filter rack. The filter should not have gaps around it or be loose. If the filter is poorly fitted, air can bypass the filter, allowing unfiltered air to enter your HVAC system and be circulated throughout your home. (Also see images in the Let’s Talk Filters section)
- Lubricate moving parts to reduce wear and extend the life of components.
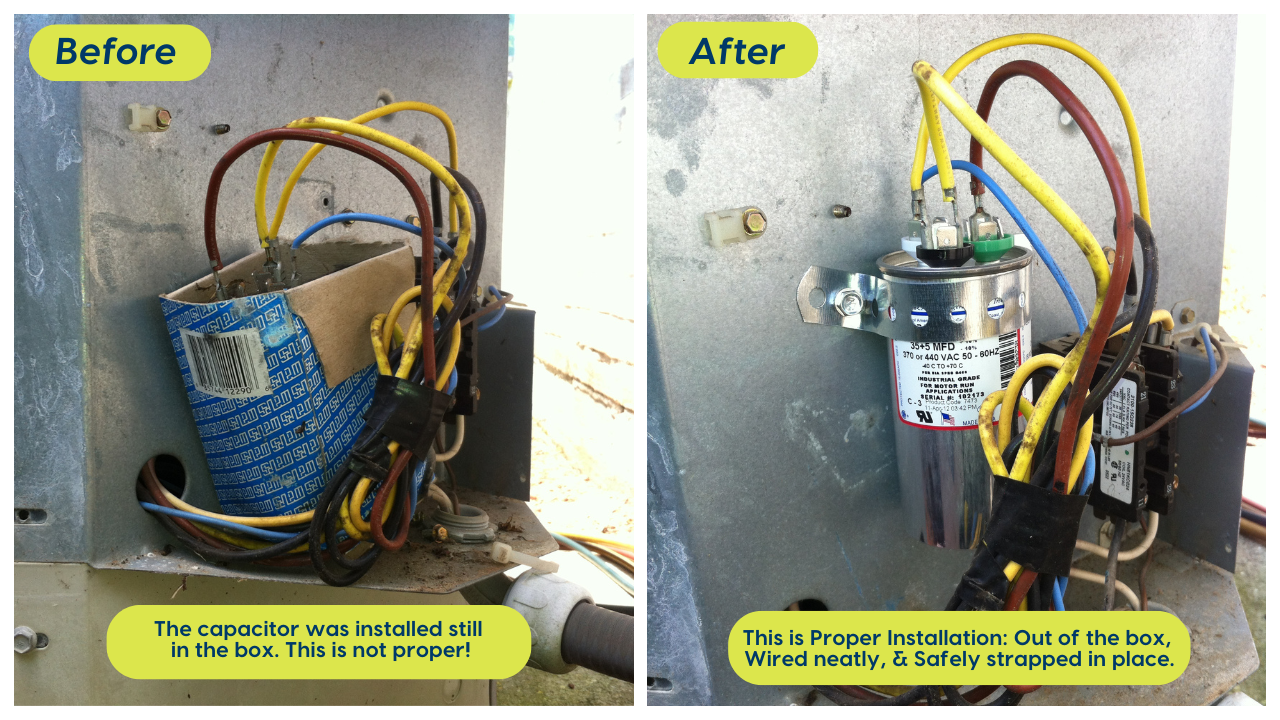
- Capacitor and Relay Testing – This ensures that these critical components are functioning within the manufacturer’s specifications and are not showing signs of failure.
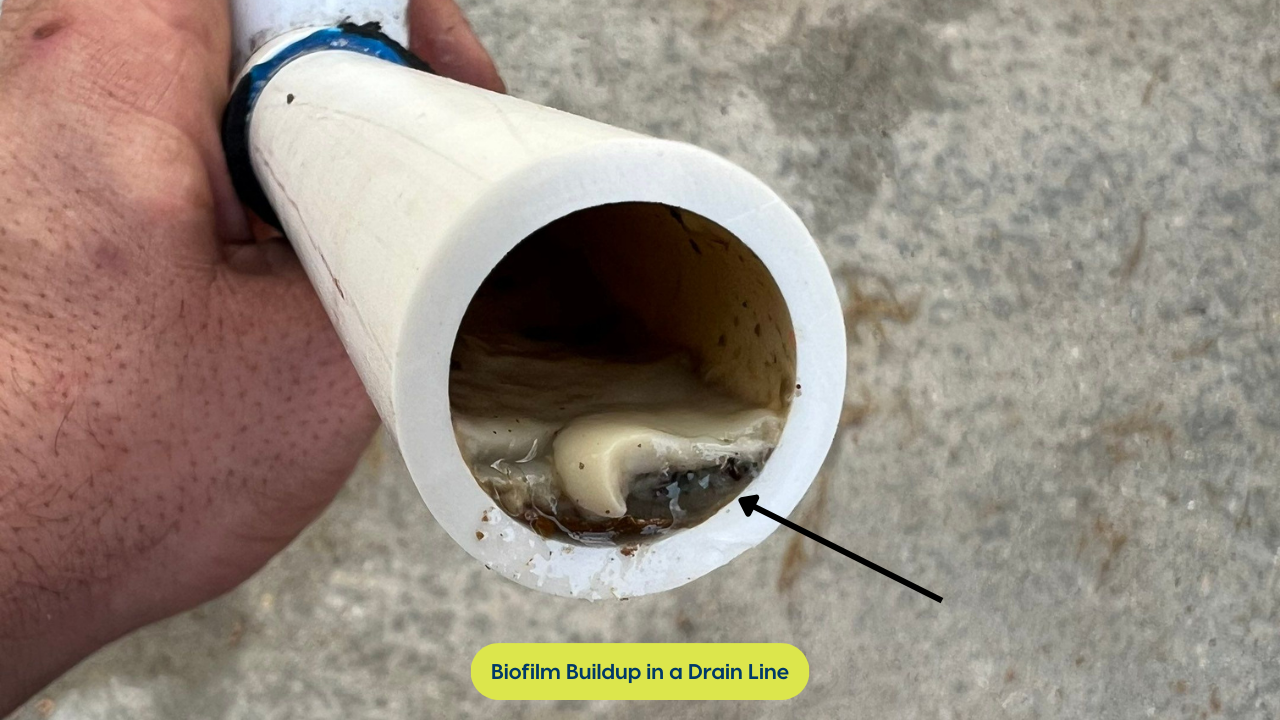
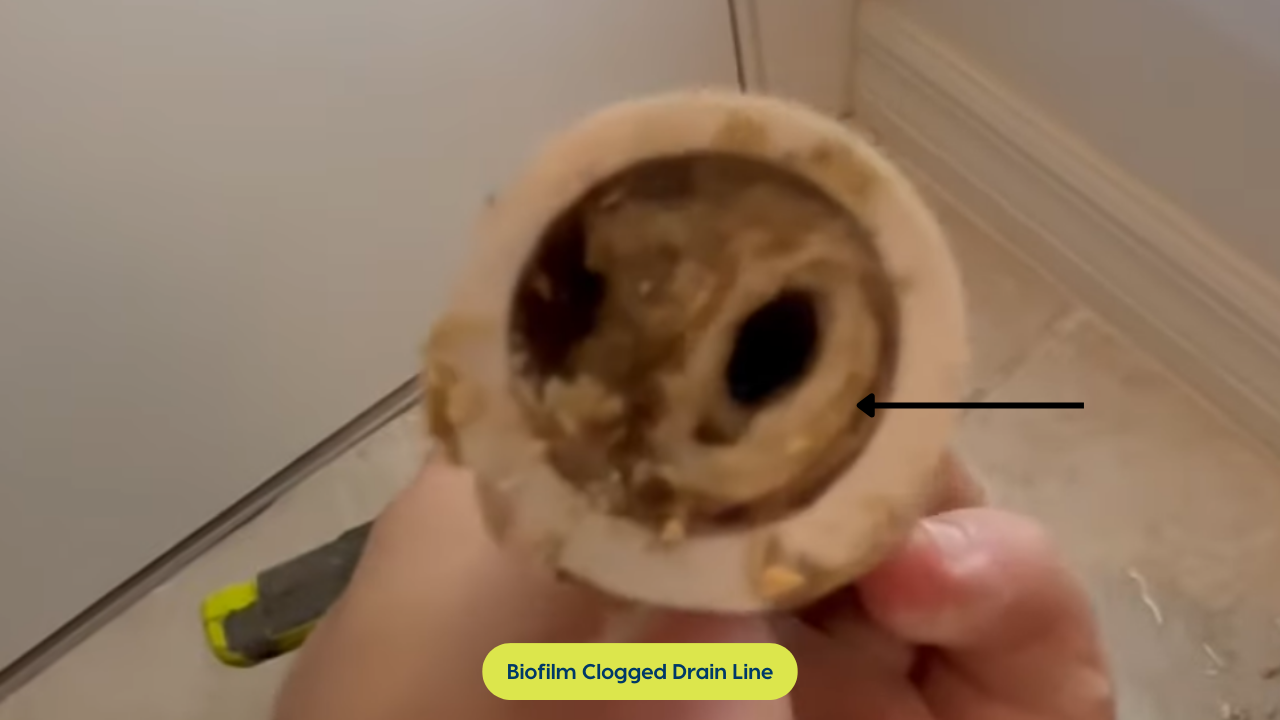
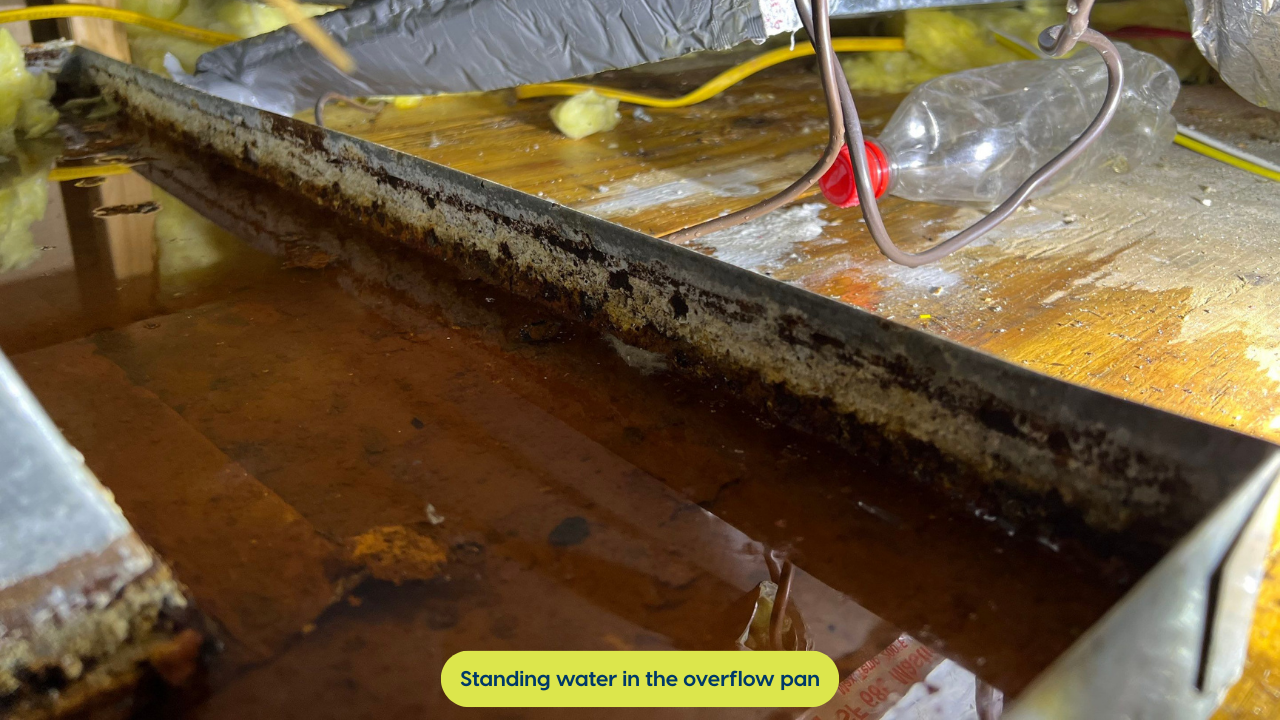
- Condensate Drain Line Cleaning and Treatment – This process prevents clogs and water backups, which helps avoid potential water damage. Mechanical cleaning should always be the first line of defense for clogged lines. Using tools like a wet-dry shop vac, compressed air, or gentle water flushing can remove blockages without risking damage or chemical exposure. Ask what they plan to use to clean the drain line and what they will use to treat the overflow pan. Avoid using chemical drain cleaners or bleach. After mechanical cleaning, using a gentle cleanser such as vinegar is acceptable.
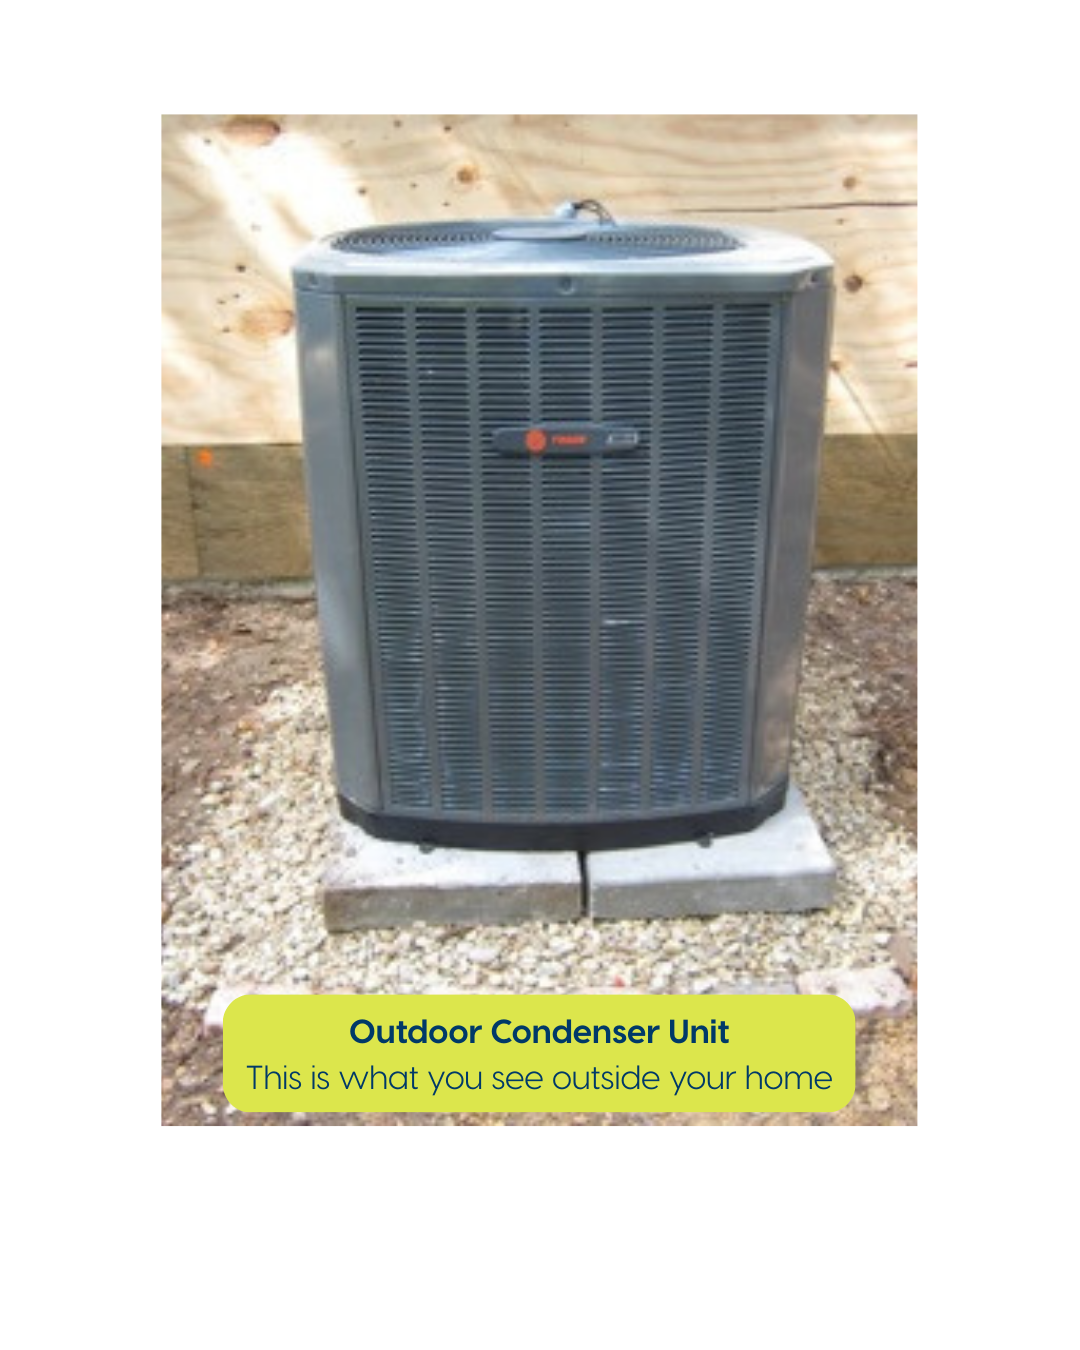
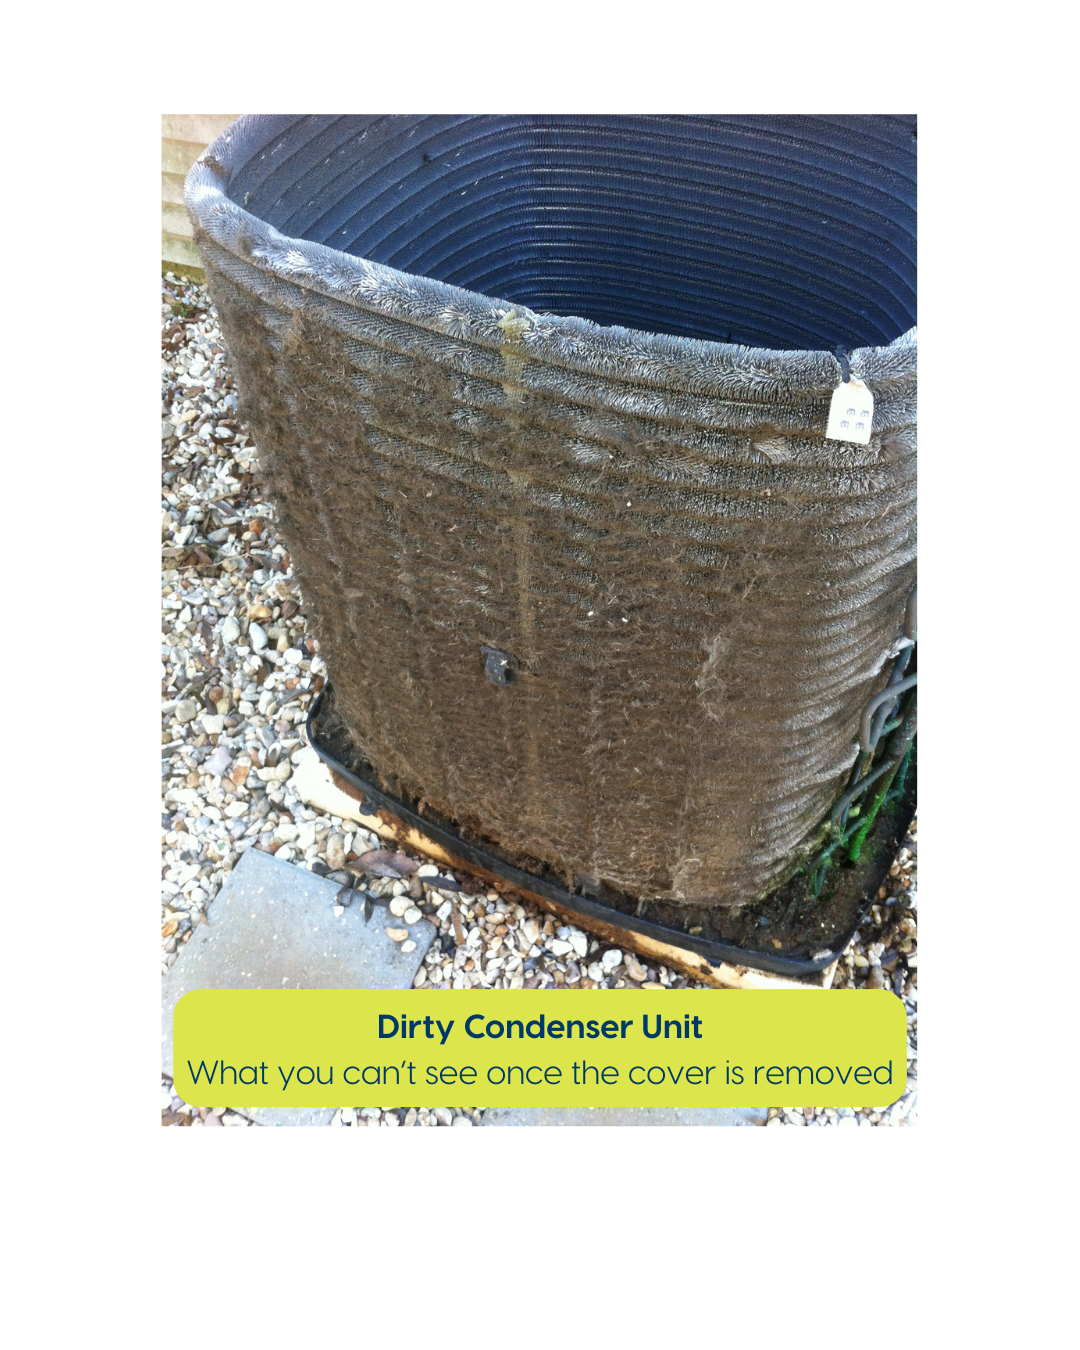
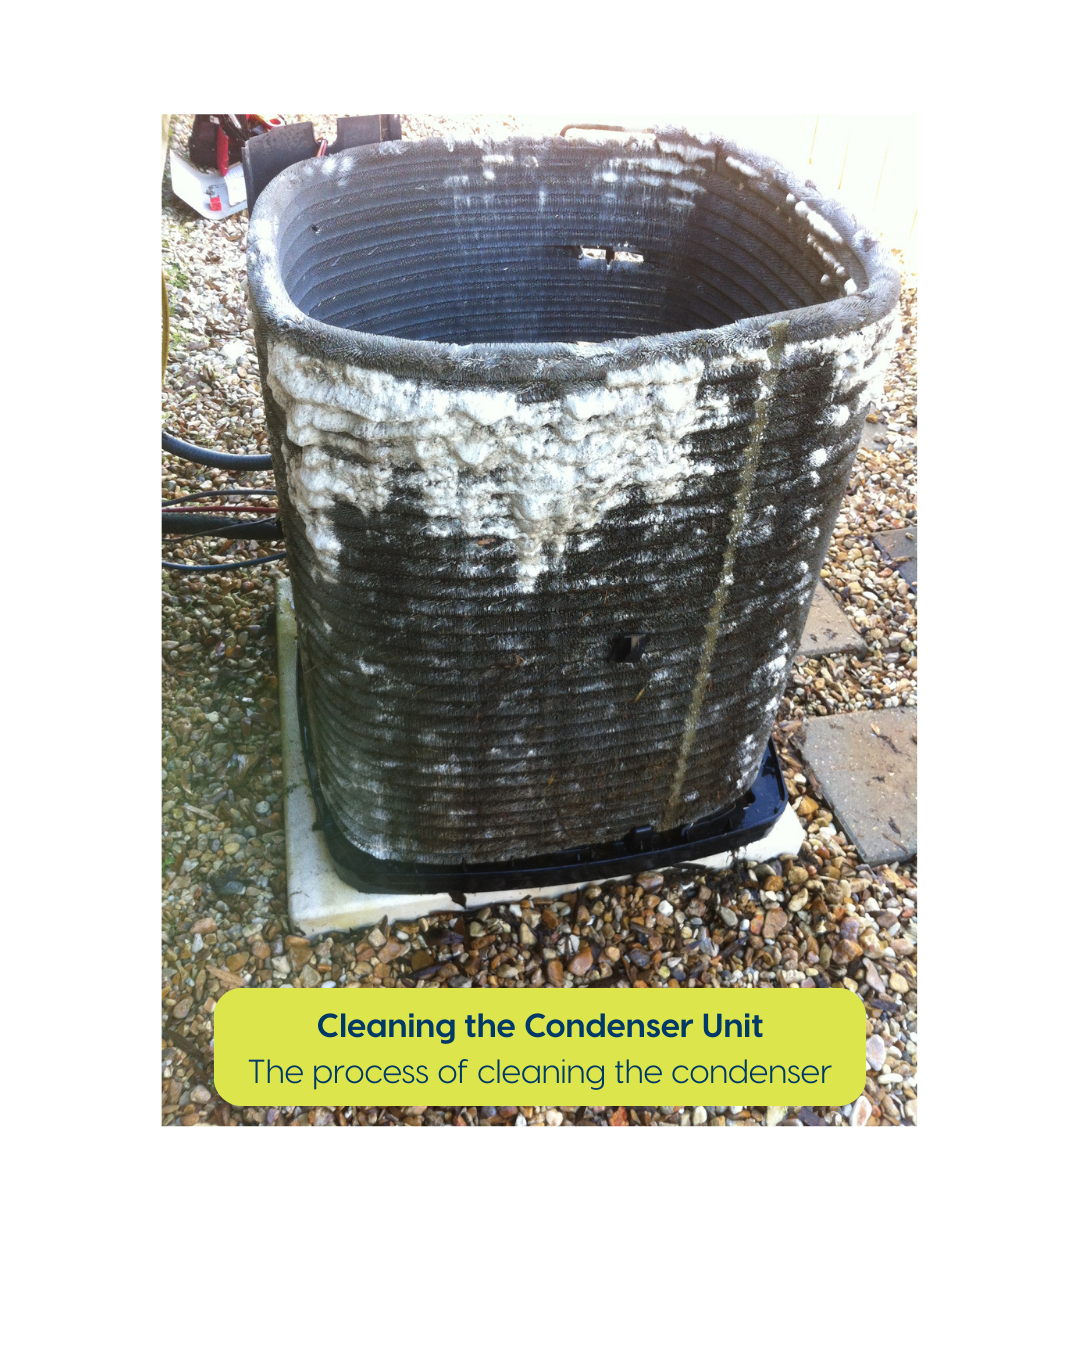
- Complete Outdoor Unit Cleaning – Disassemble (remove the cover) and thoroughly clean the condenser coils. Always ensure they clean it with a basic hose, not a high-pressure washer.
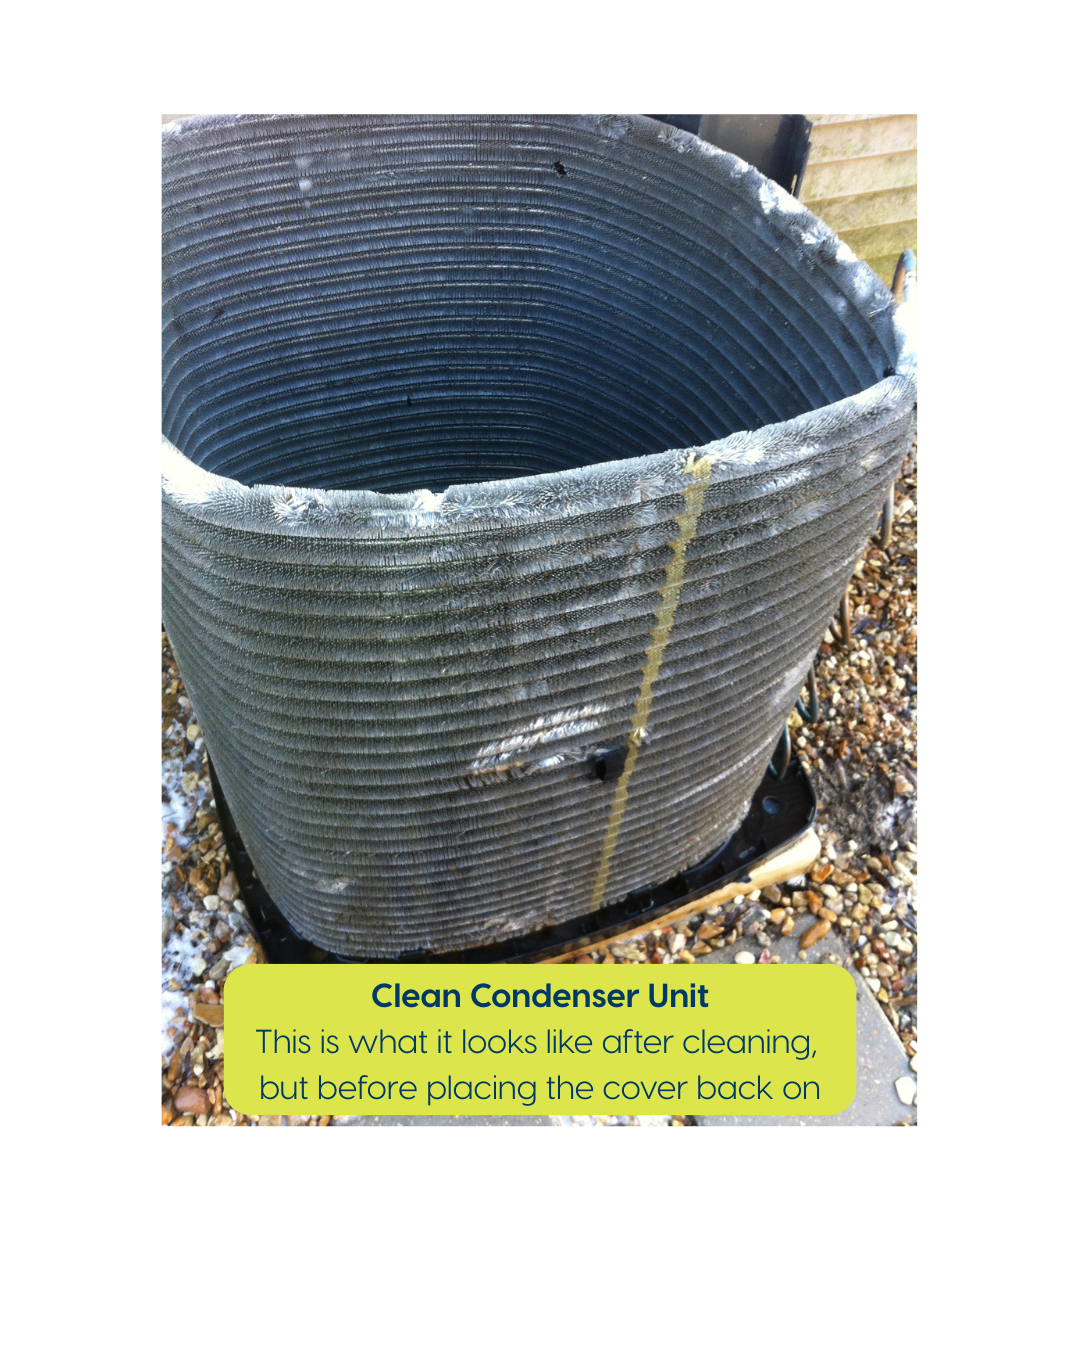
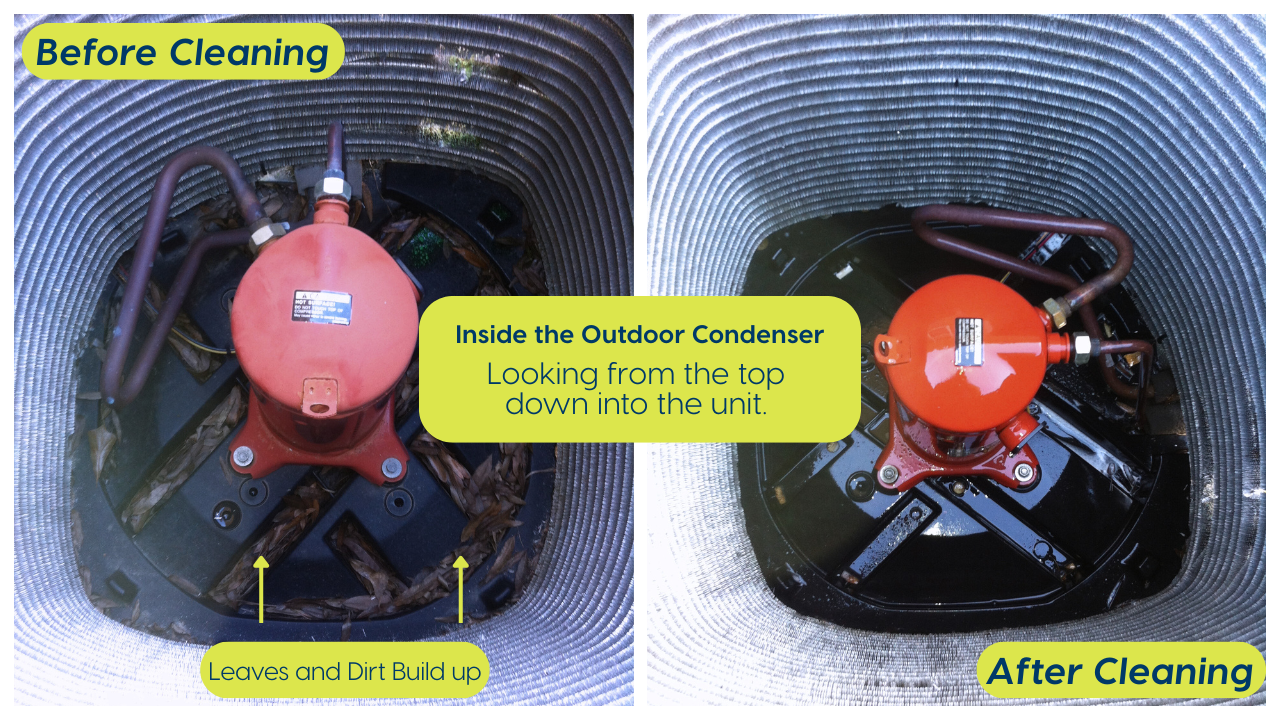
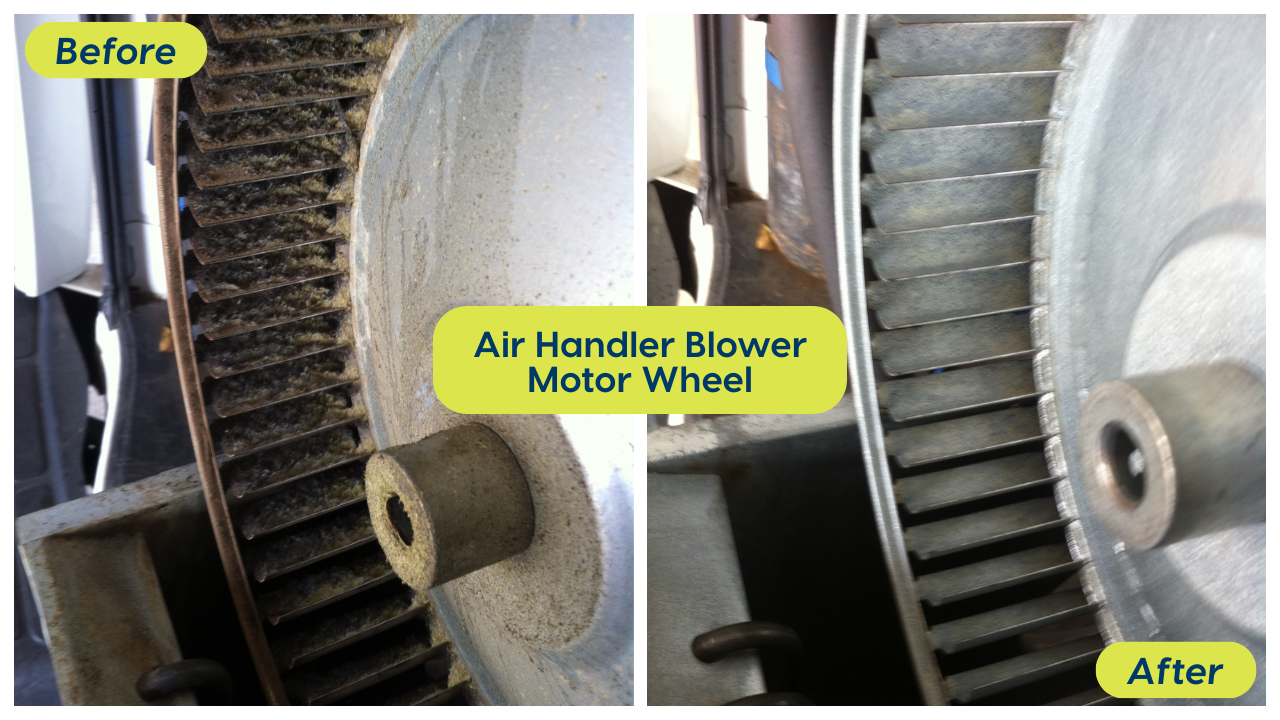
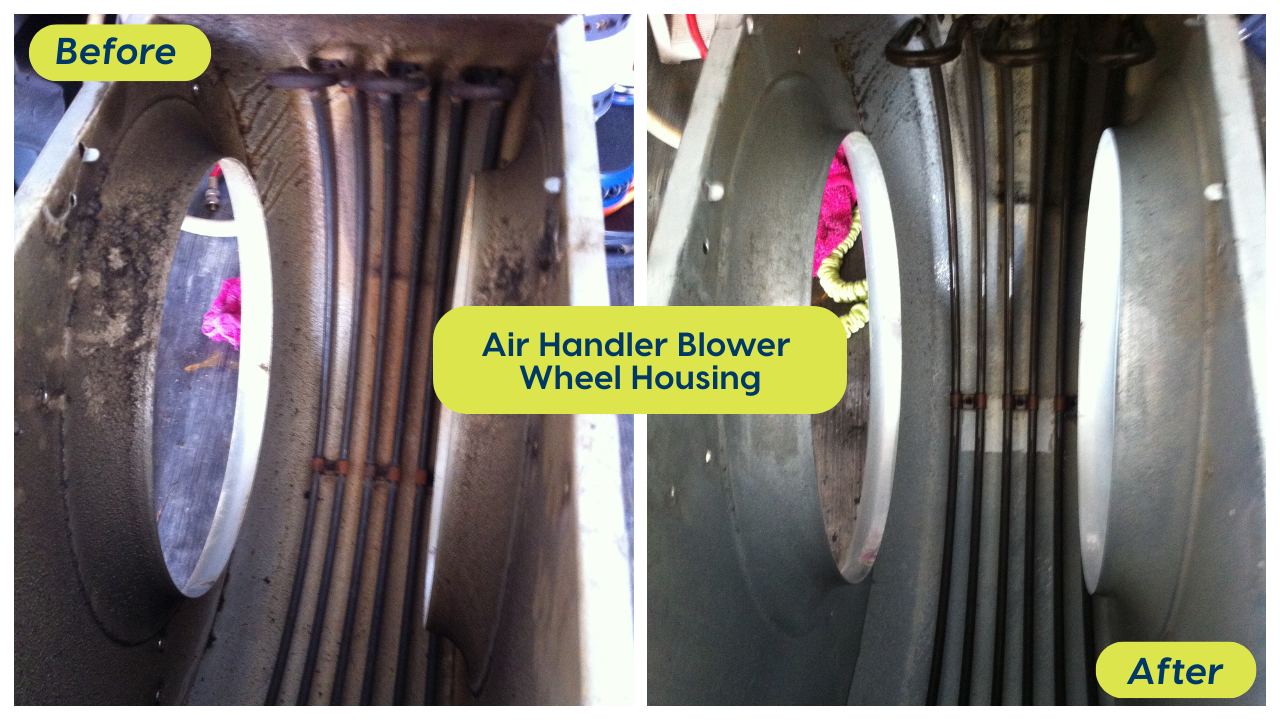
- Blower Motor and Fan Cleaning – Inspect the blower motor and wheel for dirt, debris, or imbalance to improve airflow. Similar to the evaporator coil, if it is excessively dirty, they may recommend removing the blower to clean it with soap and water or a chemical cleaner. This requires additional discussion, details, and incurs an extra charge. This is a tedious and challenging process that requires professional handling. When the blower motor is dirty, remember that it is a symptom of a root issue: moisture and dirt in the HVAC system and airstream.
Fall Checklist - Heating
The fall visit prepares for the approaching cold temperatures and the start of the HVAC heating season. This appointment ensures safe and efficient heating operation. A few items your technician may focus on are:
- Heat Exchanger Inspection – A visual inspection or combustion analyzer test can detect issues before they become life-threatening. A cracked or corroded heat exchanger can leak carbon monoxide. (Learn more about carbon monoxide in our interview here.)
- Gas Pressure Testing (gas furnace) – This verifies the inlet and manifold gas pressure, which ensures the burner receives the correct fuel supply per the manufacturer's specification. This is essential for safe operation.
- Electrical Testing (electric heat strips or backup heat) – Test the electric heating elements for amp draw and resistance. High current draw or loose connections can lead to overheating, which can cause a breaker to trip.
- Combustion Analysis and Flue Gas Testing – The technician may use a combustion analyzer to measure oxygen, CO, CO₂, and stack temperature in fuel-burning systems. These tests ensure clean, efficient combustion and check for incomplete burn, which can signal a ventilation or burner problem.
- Exhaust Vent and Flue Pipe Inspection – All fuel-burning systems must safely vent combustion gases outdoors. Blocked or deteriorated vent pipes constitute a significant safety concern and must be inspected for corrosion, back-drafting, or disconnection.
- Thermostat Testing and Calibration – This ensures your thermostat is reading the temperature accurately and not miscalibrated.
- Heat Pump Mode Check – Switch the heat pump to heating mode and verify proper operation, including the defrost cycle function.
Don’t Forget Your Add-On Equipment
If you have add-on or integrated systems, such as dehumidifiers, ERV/HRV, or media filters, they also require routine inspection and maintenance. Note: The inspection and maintenance of this equipment may incur an additional fee. These include:
- Whole-home dehumidifiers
- Clean filters and coils
- Clean drain lines
- Confirm duct connections and air draw
- Check for possible microbial buildup
- Check the dew point and that it is pulling moisture
- ERV/HRVs (Ventilation Systems)
- Clean or replace core filters
- Inspect intake/exhaust ducts
- Clean or replace the energy transfer core (as needed)
- Verify balanced airflow
You should have your professional replace deep-pleated in-system filters.
A Special Note on Maintenance Plans
Many HVAC companies offer maintenance plans that include scheduled system inspections and basic servicing. These plans can provide peace of mind and help extend the life of your equipment if they’re done properly. Before enrolling, always ask: “Do you offer a maintenance plan and can I review a copy of the contract beforehand?” Reviewing the plan in advance helps ensure you're not paying for something that offers little more than a reminder call or locks you in for years to come with a company you dislike. A maintenance plan should protect your investment, not just put your name on a list. Always make sure the service being provided aligns with your needs, your home's needs, and your HVAC system's performance needs.
A well-structured maintenance plan typically includes two visits per year. These are usually scheduled seasonally in the spring and fall. As mentioned earlier, one visit before the cooling season and one before the heating season. Some plans also include discounts on repairs, priority scheduling, or waived service or diagnostic fees.
 RED FLAGS:
As you read the maintenance plan, watch for:
- Vague descriptions, such as “visual inspection only,” with no mention of actual testing, measuring, or cleaning, or contracts that exclude the most critical performance-related tasks.
- Be wary of plans that appear inexpensive up front but charge extra for every meaningful service performed during the visit, like drain line service or condenser cleaning.
- Watch for terms and conditions that lock you into the contract. You want to be able to exit the contract with no penalties if you become unhappy with their service. Additionally, be aware of stipulations that require you to only hire them for any repair work completed on your system. You do not want a maintenance contract that mandates you can only call them for a service or repair, or the contract is voided if you allow someone else to work on your system.
A Special Note on Warranties
Another red flag is any claim that canceling their maintenance plan will void your warranty. This is misleading. Some companies may offer a 10-year labor warranty as part of their service plan or with equipment replacement. This is separate and should be clearly distinguished from the equipment manufacturer's warranty coverage.
To receive a 10-year manufacturer's warranty, your equipment must be registered with the manufacturer. That’s the key requirement. While most manufacturers require routine maintenance and upkeep to maintain the equipment warranty, it does not require that you stick with the company that installed the equipment or any specific company, for that matter. Be cautious if a company says you must continue their plan or use only their company for all future repairs to keep your warranty valid. Always ask for written warranty terms and clarify what the manufacturer covers versus what is tied to their labor contract.
IMPORTANT WARRANTY NOTE
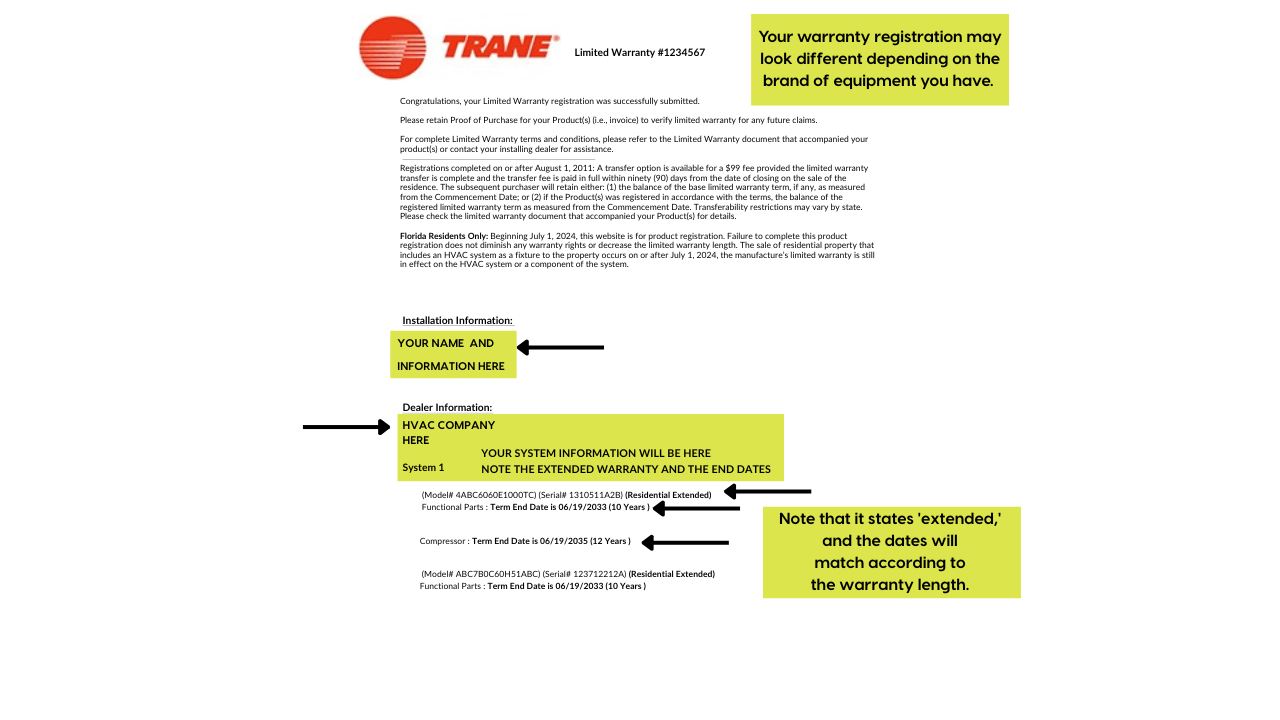
When replacing your HVAC system, make sure to ASK FOR A COPY of the warranty registration certification within 30 days of the job completion. If they do not provide you with a manufacturer's certification verifying a 10-year or longer manufacturer warranty, your equipment is not registered or in warranty for that length of time.
You automatically receive a 5-year manufacturer's warranty on all new equipment. To receive the extended warranty, the equipment must be registered in your name. Do not automatically trust the HVAC company to complete this task.
You may need to register your equipment directly with the manufacturer to receive this extended warranty if the HVAC company does not provide this service. This is not the same as an extended labor warranty. That service is sold separately by an HVAC company.
Sample Warranty Registration
Let’s Talk Filters
Filters are one of the most overlooked causes of HVAC issues. A dirty or overly restrictive filter can lead to serious problems. A filter becomes restrictive when its MERV rating is too high for the system’s design. Higher-MERV filters offer better filtration, but they also add more resistance to airflow. Most residential systems, especially older or improperly designed ones, can’t handle that added resistance without compromising performance. If you're unsure what your system was designed for, it's safer to consult a qualified technician rather than assuming more filtration is better.
Therefore, if you have a basic HVAC system that has not been routinely maintained or was not professionally designed, tested, or commissioned, it is best to use the standard 1" basic fiberglass filter and change it often. You may be able to use a slightly thicker white pleated filter, but be aware of potential red flags (see the 'Red Flags' section below). Regardless of which filters you use in your HVAC system, they should be changed routinely!
Even the EPA recognizes the potential problems dirty filters can present.
- The EPA’s Guide to Air Cleaners in the Home states, "Many factors can affect how quickly filters get dirty. Manufacturers typically recommend replacement every 60 to 90 days. If you notice that filters appear heavily soiled when you replace them, you should consider changing them more frequently."
- Their Guide to Indoor Air Quality states, “If manufacturer's instructions are not readily available, change filters once every month during periods of use."
Leaving a restrictive filter in for too long can cause it to become more sensitive to buildup, limiting or blocking airflow, increasing static pressure, causing coil freezing, leading to microbial growth on coils and in ductwork, and overworking the blower motor.
Other instances where it makes sense to change your filter more frequently, possibly monthly, include:
- You live in a dusty climate or a rural area
- You have indoor pets: dogs, cats, birds
- You live in an area prone to smog or close to a busy interstate or freeway
- You live in fire-prone areas
- If you have had recent renovation work or new construction in the area
- You use wood-burning fireplaces, burn candles, smoke, or vape inside
- Someone in the home has allergies or respiratory issues
 RED FLAGS regarding your filter:
- If your return is noisy when you replace your filter: The filter may be too restrictive.
- If it feels like the filter wants to be sucked up into the return plenum: The filter may be too restrictive.
- If you can easily move the filter around from side to side in the return plenum: The filter is too small.
- If airflow feels weak: The filter may be too restrictive, preventing adequate airflow.
- If your coil is freezing up: The filter may be too restrictive, preventing adequate airflow, which is what caused the coil to freeze.
- If you're using a high-MERV filter, such as MERV 13 or above, in a system that wasn't designed to handle that level of restriction, it can reduce airflow and cause performance issues. Instead, use the highest MERV rating your system can accommodate, which for many standard systems may fall between MERV 1 and 8.
THEN CHECK OR REPLACE YOUR FILTER!
